A virtual local area network (VLAN) is a way of creating multiple logical networks on a single physical network. VLANs can group devices or users based on different criteria, such as function, location, or security level. Devices in the same VLAN can communicate with each other directly, while devices in different VLANs need a router or a switch to communicate.
VLANs enhance network performance, security, and management by reducing broadcast traffic, isolating sensitive data, and simplifying network design and deployment. They use tags to identify which network frames belong to which VLAN. Following the IEEE 802.1Q standard, VLANs include a 32-bit field that contains a VLAN identifier (VID) ranging from 1 to 4094.
This “VLANs Setup Guide – Dedicated Servers & VPSs” article will take you through setting up a VLAN using the automated system within the customer portal to allow you to connect dedicated servers while going even further by connecting them to your VPSs. The guide is divided into three sections, explaining how to create a VLAN for only dedicated servers, only VPSs, and both.
Connecting Dedicated Servers
This process describes creating a VLAN for communication between your physical dedicated servers using the private link.
- Head over to Hivelocity.net and log in to the customer portal.
- Once logged in, the screen below will appear, listing all current devices.

Devices Page Showing All Assigned Devices - To add dedicated devices to a VLAN, the bonded interfaces would need to first separate to allow such communication.
- Bonded interfaces allow for redundancy thus utilizing both the public and private interfaces. When connecting a device to a VLAN, that bond redundancy is broken to facilitate VLAN communication via the private interface while maintaining the public communication on the public interface.
- Note 1 – You must perform this bond breaking and interface enabling actions for any dedicated device planned to be added to a VLAN.
- Note 2 – Since not all devices are bonded, you can skip the next few steps involving breaking the bond if the device you’re working on is not bonded.
- Note 3 – Breaking the bond involves downtime as OS configuration would be required to reflect the changes made. For assistance with moving the OS configuration from a bonded setup to non-bonded in the OS please reach out to the Support team via chat or a support ticket.
- Bonded interfaces allow for redundancy thus utilizing both the public and private interfaces. When connecting a device to a VLAN, that bond redundancy is broken to facilitate VLAN communication via the private interface while maintaining the public communication on the public interface.
- Press the device ID# that you wish to add to the network. For this example, #22811 was selected but note that the activity will be done for any dedicated device that is to be added to a VLAN.

Device Main Page - Press on the “Interfaces” button to view the existing interfaces and press on “UNBOND” to break the network bond followed by pressing on “Yes, Disable BOND0” when prompted to disable the bond.
- Note that you will be notified of a pending/queued network task. Wait a few minutes until the task is complete which will display on screen when the task is complete.

Interfaces Page
- Note that you will be notified of a pending/queued network task. Wait a few minutes until the task is complete which will display on screen when the task is complete.
- Upon completion of the bond breaking process, the following screen will be presented indicating the successful bond breaking and the completed network task. Proceed to press on “Enable” in the eth1 section to enable the second interface which will be used for the network.
- Approve the action in the new prompt and allow a few minutes for the new network task to complete

Bond Breaking Complete
- Approve the action in the new prompt and allow a few minutes for the new network task to complete
- Proceed to select the “Networking” tab on the left side menu followed by selecting “VLANs” and “CREATE NEW VLAN”.

The VLANs page displays any active VLANs that you’ve configured through the portal - In the new screen you will be able to select between a “Public” and “Private” VLAN type and location.
-
- For VLAN Type, choose “Public” if you want to assign IPs to the network to make it reachable from the internet. Choose “Private” if the VLAN should never be reachable from the internet.
- For Location, select the facility where the network will be created. Only devices and subnets from the same facility are allowed in the network.
-
-
For this example, “TPA2” is used since there are 5 devices at that location (2x Dedicated and 3x VPS). Next, select Private, as we wish to create a private network. Finally, press “ADD VLAN,” and the new VLAN will be created.

Creating a New VLAN -
Now that a VLAN was created, adding the devices we wish to add is the next task. Proceed to press on the VLAN ID#.

VLANs page displaying the newly created VLAN - On the next page, proceed by pressing “Edit VLAN,” which will display the potential members available to add to the network. Specifically, in this case, these members are the two dedicated servers labeled clever-stonebraker.hivelocitydns.com and romantic-blackwell.hivelocitydns.com.
- Proceed to select the available devices that are to be added to the network and press on “COMMIT CHANGES”.

- Press “Submit” to submit the network changes in the next prompt. Once the task is sent, the two devices from the list will disappear and a new network task will begin. Allow it A few minutes to process and upon completion you should see the newly created VLAN.
- Once the process is complete, the device’s eth1 ports will be added accordingly in the “Ports” list for the newly created network. Communication between the two devices can now commence once configuration on the private interfaces is made in the OS of all involved devices.

Devices Added to the VLAN
Connecting Virtual Private Servers via VLAN
This process describes creating a VLAN that can be used between your virtual private servers (VPS) only.
- Head over to Hivelocity.net and log in to the customer portal.
- Once logged in, the screen below will appear, listing all current devices.
Devices Page Showing All Assigned Devices - Proceed to select the “Networking” tab on the left side menu followed by selecting “VLANs” and “CREATE NEW VLAN”.
The VLANs page displays any active VLANs that you’ve configured through the portal - Proceed to create a new VLAN by pressing the “Create New VLAN” button. Here you will be able to select between a “Public” and “Private” VLAN type and location.
- For VLAN Type, choose “Public” if you want to assign IPs to the VLAN to make it reachable from the internet. Choose “Private” if the VLAN should never be reachable from the internet.
- For Location, select the facility where the VLAN will be created. Only devices and subnets from the same facility are allowed in the VLANs.
-
For this example, we will use “TPA2” since there are 5 devices at that location (2x Dedicated and 3x VPS). Next, select Private, as we wish to create a private VLAN. Finally, press “ADD VLAN,” and the new VLAN will be created.
Creating a new VLAN -
Head over to the “VPS Networks” tab. This is where the network between the VPSs will be made. Press on “ADD VPS NETWORK”.

- Fill the new VPS network with a “Network Name” of choice, the “Location” where the VPSs are located, and select the VLAN ID that was created in the previous steps. Press on “ADD NETWORK” once ready.

Creating a VPS Network - Once the VPS network is created, it will be visible in the VPS Networks page. Press on the VPS network name that was created to edit it. Processing can take a few minutes before the VPS network appears so allow it some time.

Newly Created VPS Network with VLAN Connectivity - Press on the “ADD VPS DEVICE” button and select the VPSs you wish to add to the VPS network.
- Proceed to select each device and press on “ADD VPS DEVICE” for each.
- Allow a few minutes for each network task to complete per device being added.

Empty VPS Network 
Adding VPSs to the Network VPS
- Once the process is complete, communication between the devices can now commence once configuration on the private interfaces is made in the OS of all involved devices.

VPSs Added to the new VPS Network
Connecting Dedicated Servers & Virtual Private Servers
This process describes creating a VLAN that can be used between dedicated servers and virtual private servers (VPS).
- Head over to Hivelocity.net and log in to the customer portal.
- Once logged in, the screen below will appear, listing all current devices.
Devices page showing all of your assigned devices - Proceed to select the “Networking” tab on the left side menu followed by selecting “VLANs” and “CREATE NEW VLAN”.
The VLANs page displays any active VLANs that you’ve configured through the portal - Proceed to create a new VLAN by pressing the “Create New VLAN” button. Here you will be able to select between a “Public” and “Private” VLAN type and location.
- For VLAN Type, choose “Public” if you want to assign IPs to the VLAN to make it reachable from the internet. Choose “Private” if the VLAN should never be reachable from the internet.
- For Location, select the facility where the VLAN will be created. Only devices and subnets from the same facility are allowed in the VLANs.
-
For this example, we will use “TPA2” since there are 5 devices at that location (2x Dedicated and 3x VPS). Next, select Private, as we wish to create a private VLAN. Finally, press “ADD VLAN,” and the new VLAN will be created.
Creating a new VLAN - To establish a connection between the virtual private servers and dedicated servers proceed press on the VLAN ID that was just created.

Editing the VLAN - On the next page, proceed by pressing “Edit VLAN,” which will display the potential members available to add to the VLAN. Specifically, in this case, these members are the two dedicated servers labeled clever-stonebraker.hivelocitydns.com and romantic-blackwell.hivelocitydns.com.
- Select the available devices to add to the VLAN and press “Commit Changes.”
- Press “Submit” to submit the VLAN changes in the next prompt. After sending the task, the two devices from the list will disappear, and a new network task will begin. Allow it A few minutes to process and upon completion you should see the newly created VLAN.
- Once the process completes, the device’s eth1 ports appear in the “Ports” list for the newly created VLAN.
Devices Added to the VLAN -
Head over to the “VPS Networks” tab. This is where the network between the VPSs will be made. Press on “ADD VPS NETWORK”.
- Fill the new VPS network with a “Network Name” of choice, the “Location” where the VPSs are located, and select the VLAN ID that was created in the previous steps. Press on “ADD NETWORK” once ready.
Creating a VPS Network - Once the VPS network is created, it will be visible in the VPS Networks page. Press on the VPS Network name that was created to edit it. Processing can take a few minutes before the VPS network appears.
Newly Created VPS Network with VLAN Connectivity - Press on the “ADD VPS DEVICE” button and select the VPSs you wish to add to the VPS network.
- Proceed to select each device and press on “ADD VPS DEVICE” for each.
- Allow a few minutes for each network task to complete per device being added.
Empty VPS Network Adding VPSs to the Network VPS
- Once the process is complete, the VPSs that were added will display in the VPS Network.
VPSs Added to the new VPS Network - Now that the dedicated servers and VPSs are connected, communication between the devices can begin after configuring the private interfaces in the OS of all involved devices.
Configuring Communication & Private IPs Within the OS for VLAN-Connected Devices
Now that you have a private network between your VPSs and Dedicated servers, you can communicate privately among them without having to dip into your public traffic quota.
To configure the private network between your devices within the OS, it is recommended that you contact Hivelocity Support team members by calling 888-869-4678, creating a support ticket via the customer portal, or reaching out via chat through the Hivelocity.net portal. If you would like to proceed on your own, an example is shown below with two AlmaLinux 9 in the displayed split screen.
- Login to your VPSs as root and use the command ip a to view that you now have “eth1” interface for private communication.

Split view of both servers and their ip a command output - Use the command nmtui to alter the network configuration on eth1.
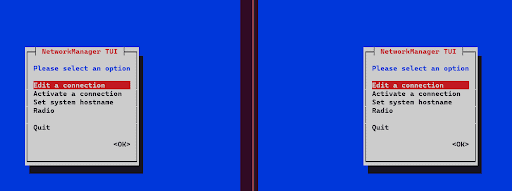
nmtui command’s GUI displaying the NetworkManager connection editing options - Press on “Edit a Connection” and select “Wired Connection 1” followed by selecting “<Edit…> to proceed.
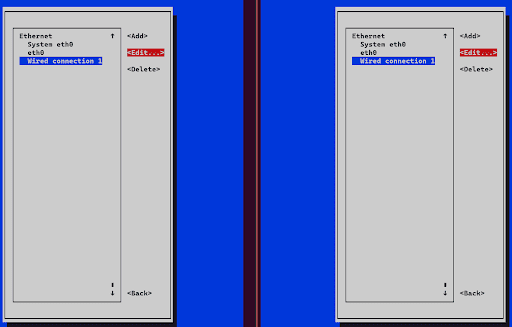
nmtui command’s GUI displaying the NetworkManager connection editing options for the private interface -
For example, we will use /24 so any IP address changes will be made only in the last octet.
- Select IPv4 Configuration – “Manual”
- The first device will be 10.0.0.2/24
- The second device will be 10.0.0.3/24.
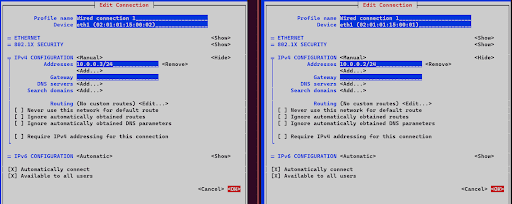
nmtui command’s GUI displaying the NetworkManager connection options - Once done with the above, press “OK” and head back by pressing the Escape key once.
- Proceed to select “Activate a connection”.
- Select “Wired Connection 1” under “Ethernet (eth1) and Press on “Deactivate” followed by “Activate”.
- Press the Escape key until you are back in the shell.
- Now use the command ip a to see the new IP information we’ve added.
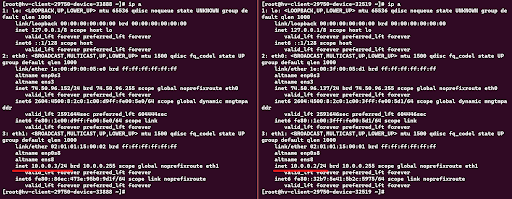
Split view of both servers and their ip a command output with the newly added private IP - Test the connection by pinging using the ping command to each device from one another.
- If you are experiencing issues communicating between a VPS and a dedicated server, please reach out to the Support team so that they can review and escalate accordingly.

-Written by Pascal Suissa