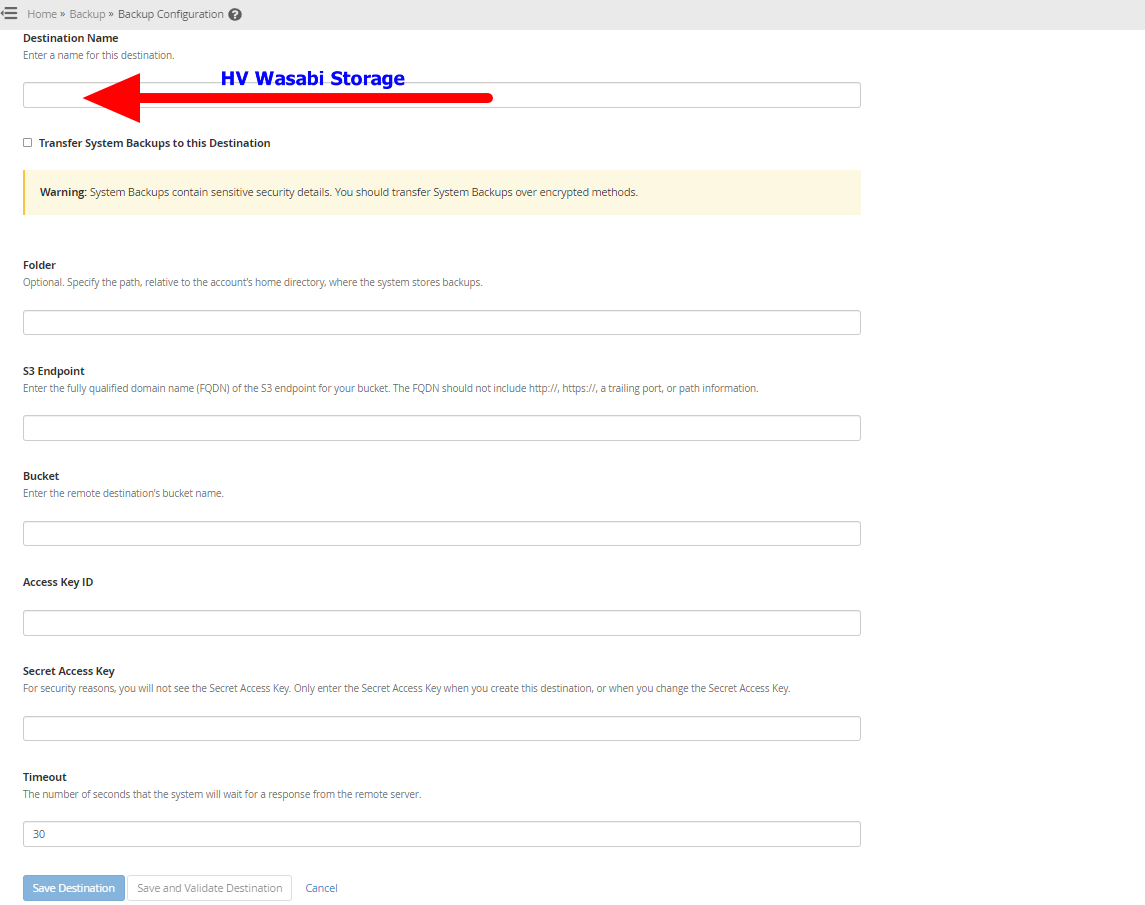
In order to use Wasabi Cloud Storage alongside cPanel, you must first set up your storage bucket within Wasabi. If you need help setting this up, please refer to: How to Setup Wasabi Cloud Storage.
Once you’ve created your bucket in Wasabi, you’ll need to save the following details somewhere you can easily access them for use with cPanel:
- Bucket name: Must begin with lowercase letter or number.
- Region:
- Access Key ID:
- Secret Access Key: For security reasons, you will not see the Secret Access Key. Only enter the Secret Access Key when you create this destination, or when you change the Secret Access Key.
*Note: S3 Endpoint and region should be chosen based off your server’s device location.
This is the list of the regions and the service URLs for Wasabi:
What are the service URLs for Wasabi’s different storage regions? – Wasabi Knowledge Base
The Wasabi service URLs are as follows:
|
Region |
Service URL |
Alias/Alternative URL |
|
Wasabi US East 1 (N. Virginia) |
||
|
Wasabi US East 2 (N. Virginia) |
|
|
|
Wasabi US Central 1 (Texas) |
|
|
|
Wasabi US West 1 (Oregon) |
|
|
|
Wasabi EU Central 1 (Amsterdam) |
||
|
Wasabi EU West 1 (London) |
||
|
Wasabi EU West 2 (Paris) |
||
|
Wasabi AP Northeast 1 (Tokyo) |
|
|
|
Wasabi AP Northeast 2 (Osaka) |
|
Setting up Wasabi in cPanel
To set up Wasabi Storage with cPanel, just follow these steps:
- First, log in as the root user in WHM and go to the backup config section:
Home »Backup »Backup Configuration

-
Next, click the button labelled Create New Destination and fill in the form below with the backup information that was created in wasabi for the bucket information.

- Once you have the details filled in, you should now save and validate the destination to confirm all information is valid and working.
- If it’s valid, you can enable the backup and the next time it runs it will upload the backups to the wasabi bucket.
- If not, review the steps above and confirm its setup correctly.
*Note: To force cPanel backup to run, you can use the following command in ssh.
/usr/local/cpanel/bin/backup –force
Troubleshooting
If you believe your firewall could be causing issues, review the steps below for CSF hostname whitelisting.
For CSF and DNS/IP whitelisting, use the following steps to add to CSF:
-
Open the file /etc/csf/csf.dyndns and add the hostname of the region you are connecting to. You can also whitelist all regions using the list below:
s3.wasabisys.com
s3.us-east-1.wasabisys.com
s3.us-east-2.wasabisys.com
s3.us-central-1.wasabisys.com
s3.us-west-1.wasabisys.com
s3.eu-central-1.wasabisys.com
s3.nl-1.wasabisys.com
s3.eu-west-1.wasabisys.com
s3.uk-1.wasabisys.com
s3.eu-west-2.wasabisys.com
s3.fr-1.wasabisys.com
s3.ap-northeast-1.wasabisys.com
s3.ap-northeast-2.wasabisys.com -
Open the file /etc/csf/csf.conf and set DYNDNS = “300” (which would check for IP updates every 5 minutes).
*Note: If you want the activity of the IP also ignored, set
DYNDNS_IGNORE = “1” -
When you’ve finished making your changes, restart the firewall