Setting up Domain Name System (DNS) records is a crucial component of any website. After all, it’s unlikely visitors can access your site if it doesn’t have a domain name they can search for. While this process is relatively straight-forward, it can vary greatly depending on your server’s operating system and the control panel you use. If you’re a Plesk user looking for information on changing or creating DNS records within your Plesk control panel, then this tutorial is for you.
In this guide we’ll cover the process for creating and editing DNS record within Plesk as well as covering how to add additional domains, subdomains, and domains aliases. If you have a specific issue you are trying to address, feel free to use the table of contents listed below to jump to the appropriate section.
*Note: If you need information on DNS records but aren’t a Plesk user, check out our guides on How to Create DNS Records in cPanel, WHM, or, for more general DNS information, take a look at our DNS Configuration Guide for an overview of basic DNS terminology as well as some more advanced troubleshooting techniques.
Creating DNS Records in Plesk
To create DNS records using Plesk, follow these steps:
- First, you’ll need to log in to your Plesk control panel using your username and password. You can access your Plesk account by entering the following URL into your web browser:
https://(your server’s IP address):8443
alternatively, if A records are already propagated for the server, you can use:
https://mydomain.com:8443
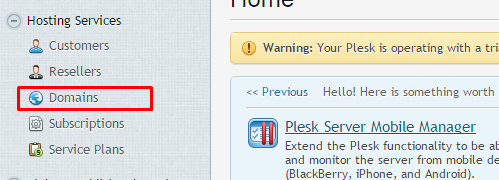
- Once you’ve logged in, on the left side of the screen, under Hosting Services, locate and click on the option for Domains.

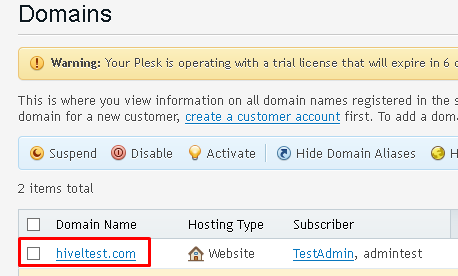
- Next, on the right side of the screen, you will see the list of domains currently hosted on your server. Locate and click on the domain you want to make changes to the DNS records for.

- After clicking on your desired domain, you will be shown a list of control options. Click on the option labelled DNS Settings, as shown in the image below.

- On the next screen, you will see a list of available tools and options related to your DNS settings. Your options include the ability to Switch Off the DNS Service, Add Records, Restore Defaults, and more. If you need to add a new DNS record, you can do so by clicking on the option to Add Record, selecting the record type, then filling out the required information for the record you are trying to create.
*Note:
if you are unsure what type of record you need to create or are unclear about their inherent differences, check the terminology section in our DNS Configuration Guide. Still unsure? Feel free to use one of the methods listed at the bottom of this post to reach out to our support team with any questions you may have.
- To change an existing DNS record, on the DNS Settings screen, scroll further down the page until you see a list of all current DNS records for the domain you’ve selected. Click on any of the records here to start making changes.

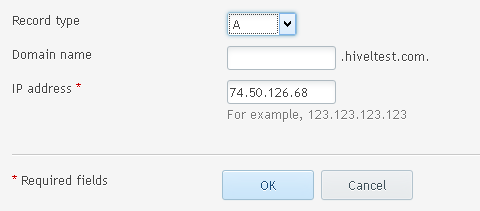
- On the next screen, you’ll have the option to change the Record type, Domain name, and IP address.

- Depending on which type of record you are trying to create, you will need to fill in different information.
- For MX Records:
- Make sure you’ve selected MX as your Record Type.
- Leave Mail Domain blank, but set the Mail Exchange Server to match the name of your mail server.
- Lastly, if your mail exchange server uses a specific priority number, enter that as well. If not, set the priority number to very high (0).
- For A records:
- Make sure you’ve selected A as your Record Type.
- For Domain Name, enter the name of the subdomain you wish to host.
- For IP Address, set it to your desired server’s IP address.
- For CNAME records:
- Make sure you’ve selected CNAME as your Record Type.
- For Domain Name, enter the name of the subdomain you wish to host.
- For Canonical Name, set it to your desired server’s name.
- For MX Records:
- After making any necessary edits, click the OK button to finalize your changes.
Adding Domains, Subdomains, and Domain Aliases in Plesk
Creating a New Domain or Subdomain
To create a new domain within Plesk, just follow these steps:
- First, log in to Plesk using your username and password.
- Locate and click on the Website & Domains tab on the left side panel.
- Click on the option labelled Add Domain.
*Note: for instructions on how to create a new subdomain, see below.
- Follow the on-screen instructions and fill out the necessary form fields with the details of your new domain.
- When you’ve finished, click OK to finalize your changes.
*If you’d like to create a new subdomain, follow the first two steps listed above, but on step 3, instead of clicking the option to Add Domain, instead, click on the option labelled Add Subdomain. Fill in the necessary information like above, and when you’re finished click OK to create your new subdomain.
Creating a Domain Alias
To create a domain alias using Plesk, follow these steps:
- After logging in to Plesk, locate and click on the Website & Domains tab.
- Next, click on the link labelled Show Advanced Operations.
- Click on the Domain Aliases icon.
- Locate the domain you’d like to create a new alias for, and to its right, click on the option labelled Manage.
- Click the Add Domain Alias icon.
- A form with blank fields will be shown. Fill out the form with the necessary information related to the domain alias you are trying to create.
*Note: fields marked with a red asterisk are required.
- When you’ve finished, click OK to finalize your changes.
And there you have it! Your DNS records are set, your server is ready to go, and you now know how to create domains, subdomains, and domain aliases as needed.