Remote Desktop Protocol (RDP) is a built-in feature in Windows that allows users to remotely access and manage computers and servers as if they were sitting right in front of them. This powerful tool is essential for IT administrators, remote workers, and troubleshooting tasks, making it a cornerstone of modern connectivity. However, RDP’s popularity and default configuration make it a common target for malicious attacks, particularly brute force attempts to gain unauthorized access.
One key step to enhancing RDP security is changing its default port. By modifying the port, you can reduce the likelihood of automated attacks targeting your server. In this comprehensive guide, we’ll explore what RDP is, its functionality, and its importance in Windows Server environments. We’ll then walk you through the process of changing the default RDP port, explain the benefits of this adjustment, and share important tips to ensure your server remains secure and accessible. Whether you’re an IT professional or a curious user, this guide will empower you to take control of your server’s security.
The flow of events involves changing the RDP port, enabling the port in the system’s firewall, and restarting the RDP services.
Part 1 – Changing the RDP Port
Changing the default RDP port on your Windows Server is a straightforward yet effective way to improve security. The default port, 3389 or 33890, are often targeted by automated attacks, making it a potential vulnerability. In this section, we’ll guide you through the steps to safely change the RDP port.
Note: It is recommended to make the changes outside of an RDP session by using IPMI as per our IPMI guide.
- Search for “regedit” within the search bar.

Searching for Regedit - Navigate to “Computer\HKEY_LOCAL_MACHINE\SYSTEM\CurrentControlSet\Control\Terminal Server\WinStations\RDP-Tcp” by going one entry at the time in this order or by pasting it at the of the screen. Once there, press on “PortNumber”.
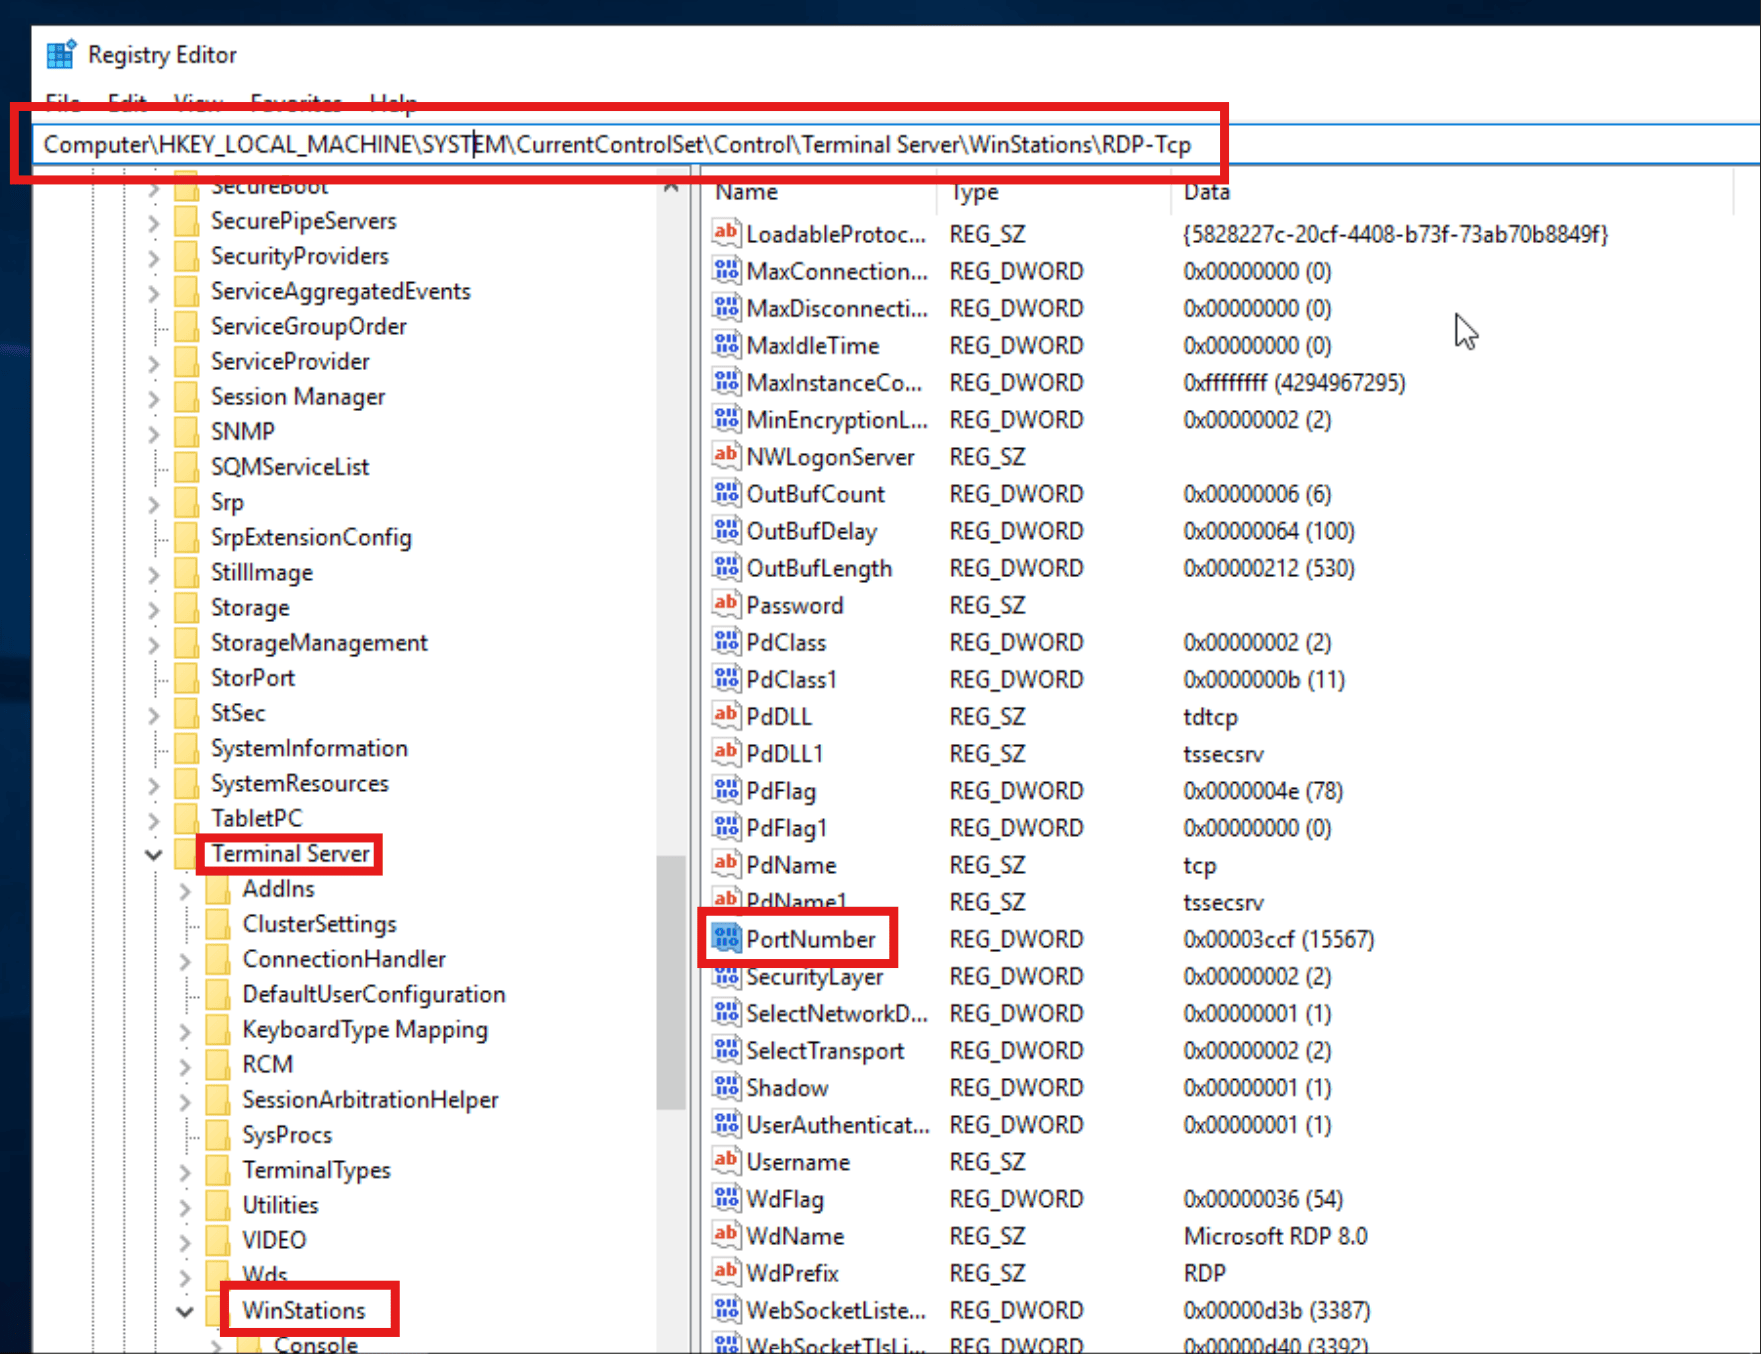
Port Number Registry Entry - Proceed to change the “Base” radio button to “Decimal” and the “Value data” to the port of choice. You can select from 1 to 65535. It’s common practice to choose a port in the 1024–49151 range (known as registered ports) or even higher, as the lower range (1–1023) is reserved for well-known services. You can also view a list of ports at https://en.wikipedia.org/wiki/List_of_TCP_and_UDP_port_numbers to help you choose one that is not used by a service in your workstation, ideally from the 5 digits range.
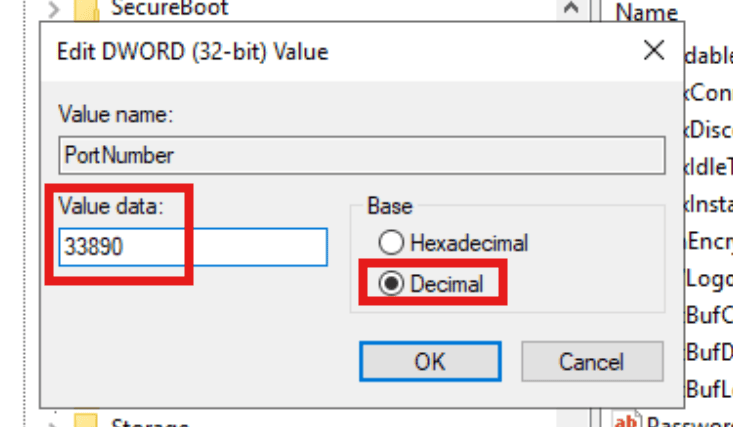
Changing RDP Port - Once you’ve changed the RDP port to another value, for example 15567, proceed to press “OK” and close regedit.
- Proceed to the next part to add a firewall rule to the new port.
Part 2 – Creating a New Firewall Rule to Allow Communication to the New RDP Port
When securing a Remote Desktop Protocol (RDP) connection, one common practice is to change the default port to enhance security and reduce unauthorized access attempts. After updating the RDP port, it is crucial to create a new firewall rule to allow traffic to the new port. This ensures that legitimate users can connect while maintaining a robust security posture. In this guide, we will walk through the steps to create a firewall rule that permits communication on the new RDP port.
- Within your Windows Server, search for “Windows Defender Firewall” and select the “Windows Defender Firewall with Advanced Security” option.

Windows Defender Firewall - In the new window, press on “Inbound Rules”, “New Rule…” and in the new windows select “Port”. Press “Next” to proceed.
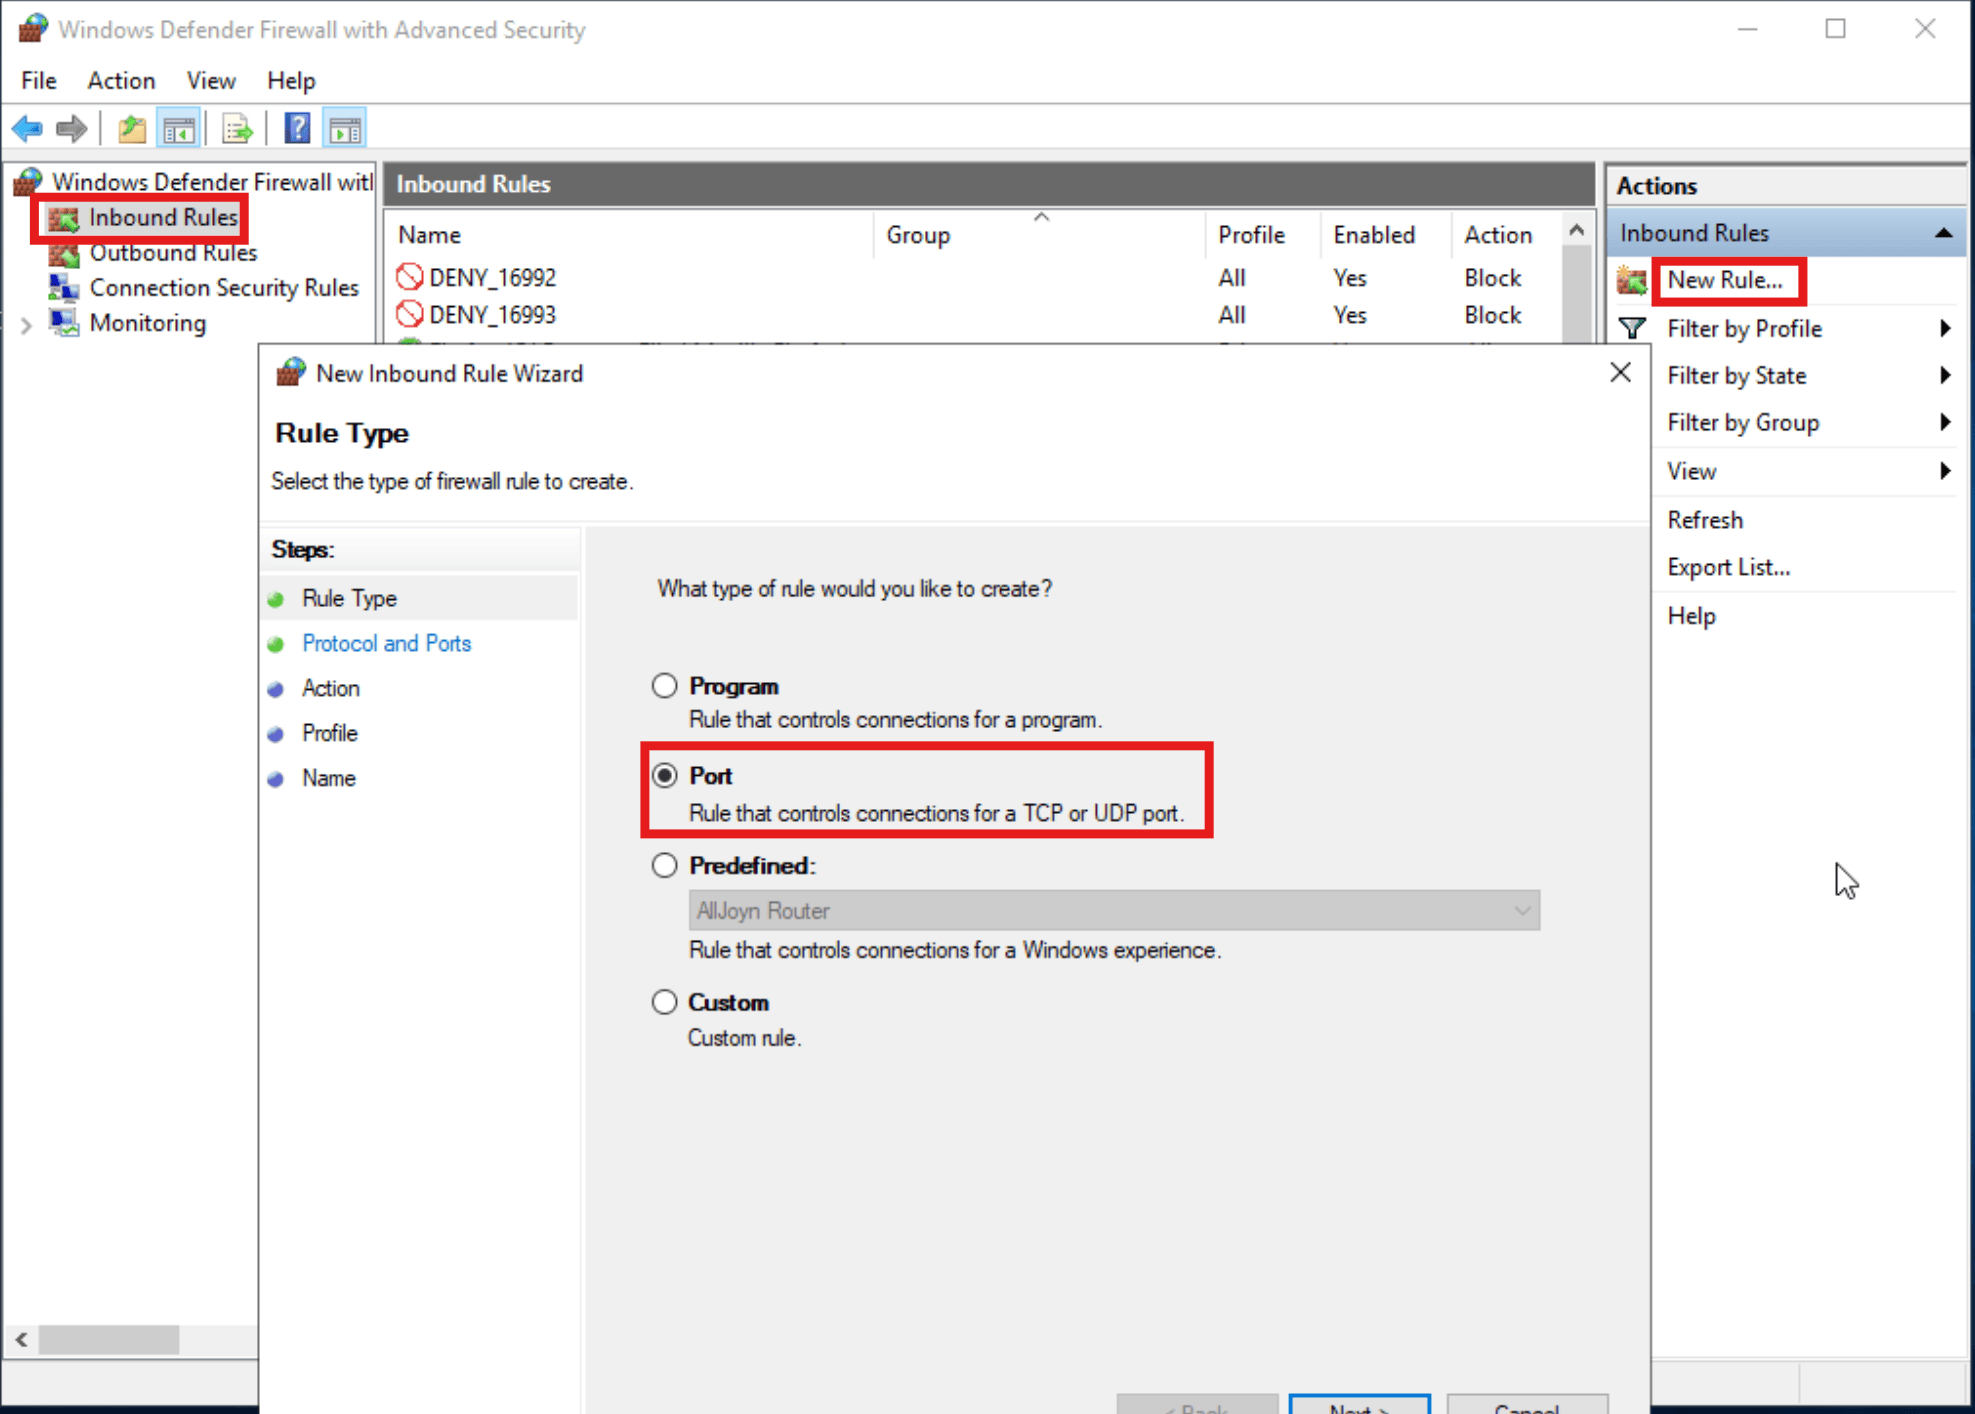
Creating New Firewall Rule - In the next screen select “TCP” and add the specific local port to your port of choice as per the image below. Press “Next” when done.
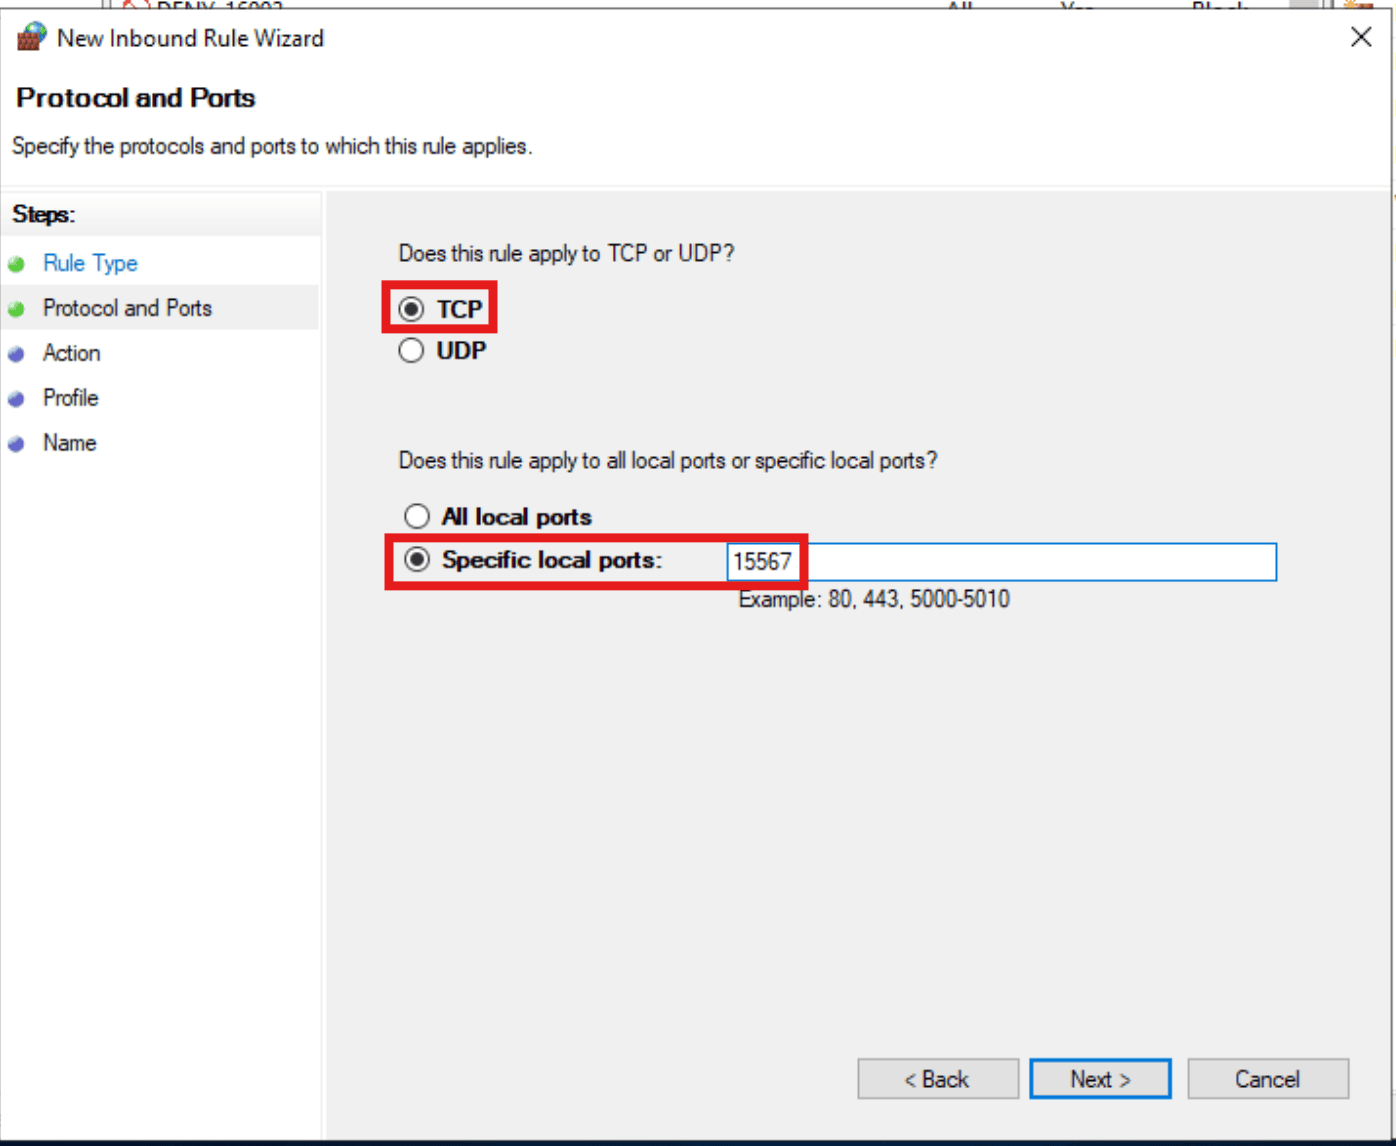
Selecting Specific Local TCP Port - In the next screen select the “Allow the connection” option and press “Next”.
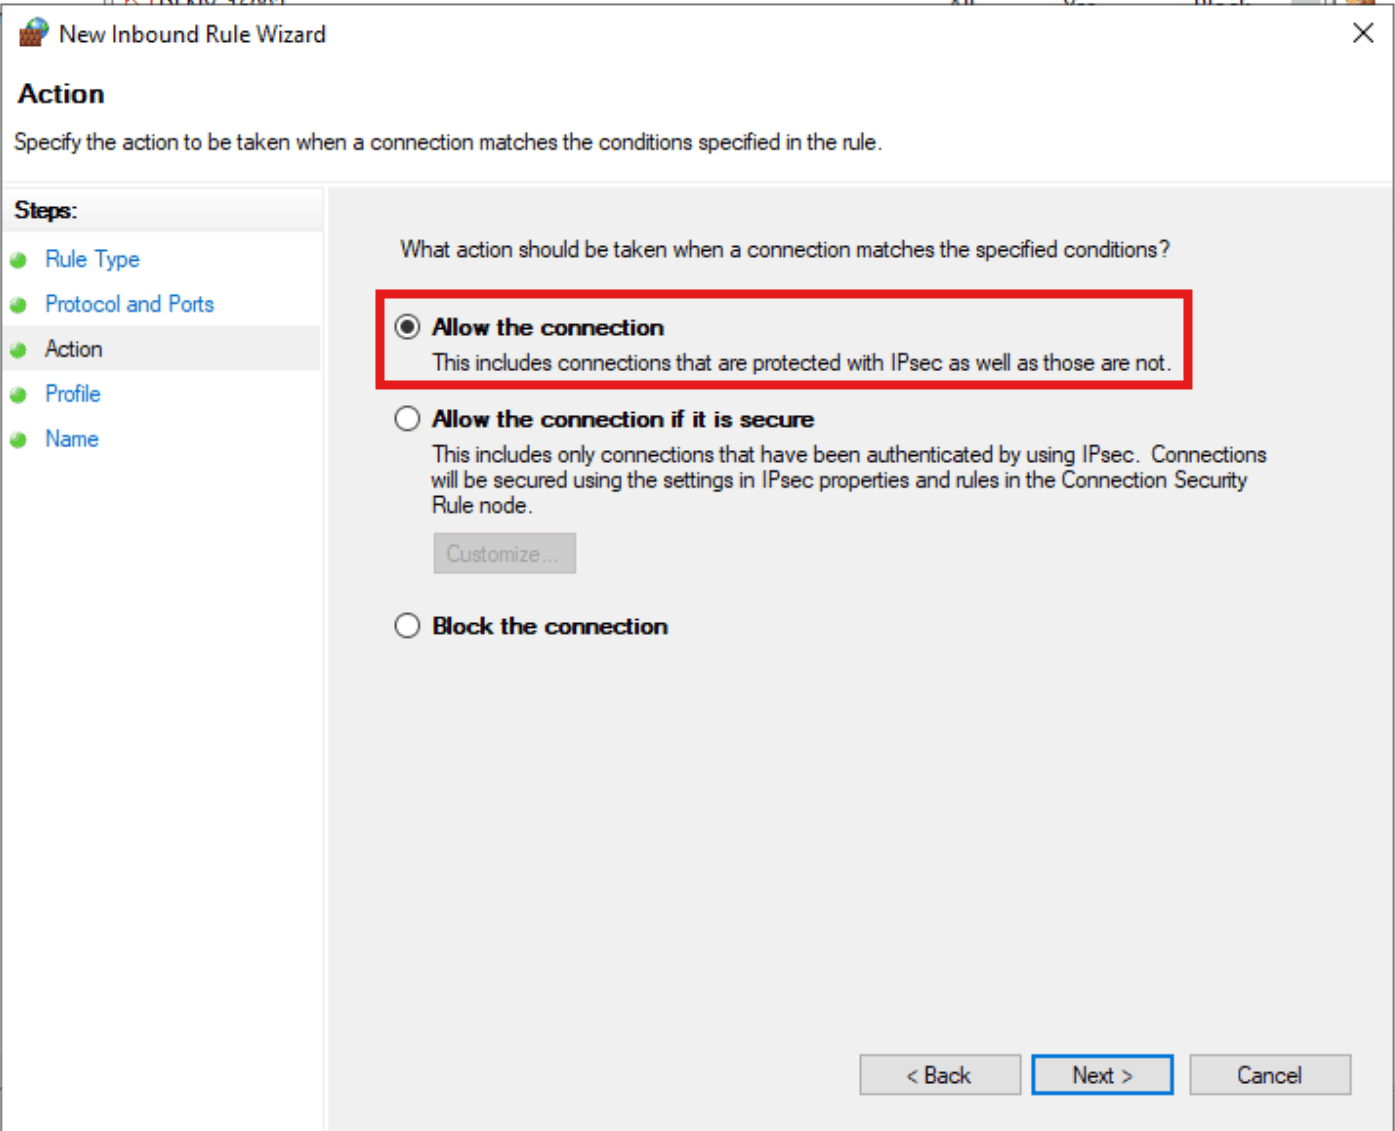
Allowing Connections to the New Port - Check all boxes on the next screen and press “Next.”
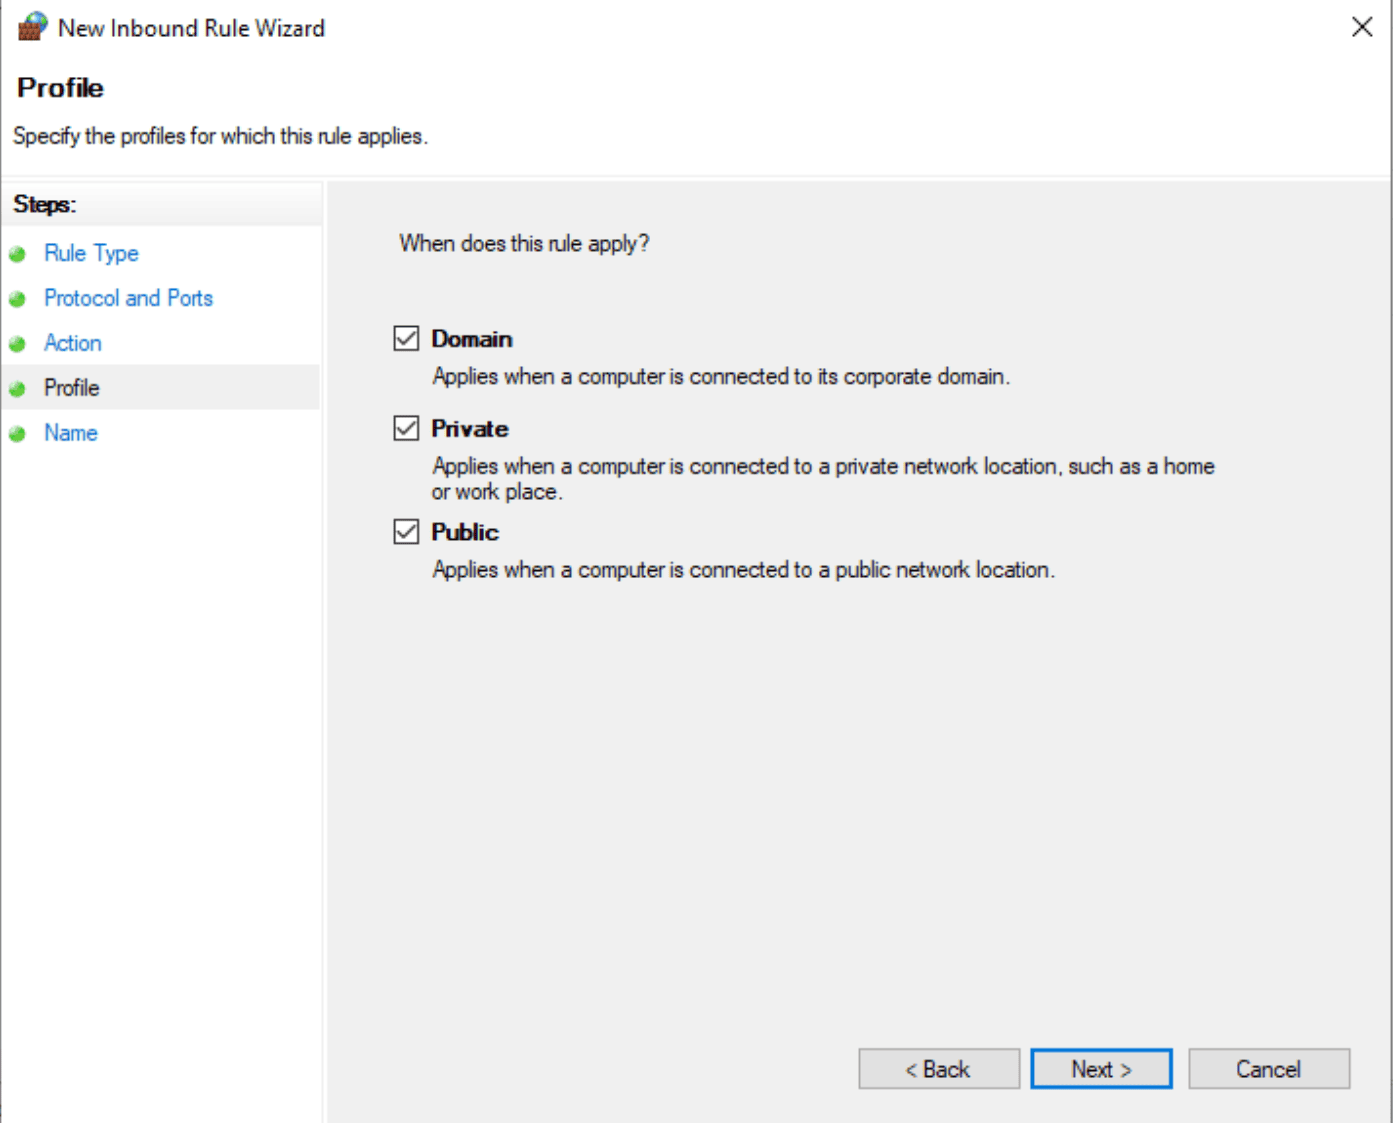
Applicable Check Boxes - In the next screen provide a name for the new rule and press “Finish”.

New Firewall Rule Name - Proceed to the next part to restart the involved remote desktop services.
Part 3 – Restarting Remote Desktop Services
Restarting Remote Desktop Services is sometimes necessary to apply changes, troubleshoot connectivity issues, or restore functionality. In this section, we’ll cover how to restart these services safely.
- Search for “Services” in the search bar within your Windows Server OS.
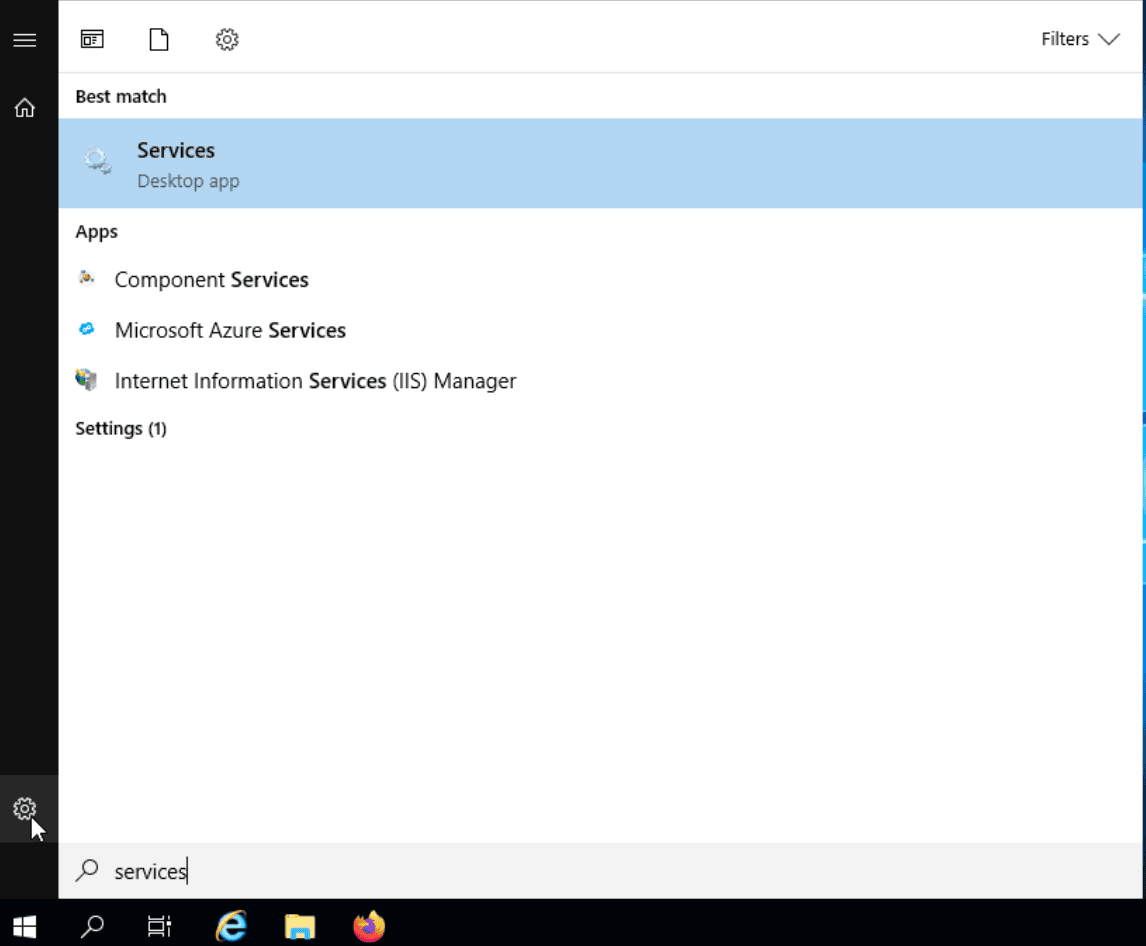
Services Program - Within the new window, search for “Remote Desktop Services” and press the “Restart Button”. Note that if you are in an RDP session you will be kicked out but not if you’re using IPMI to view the server.
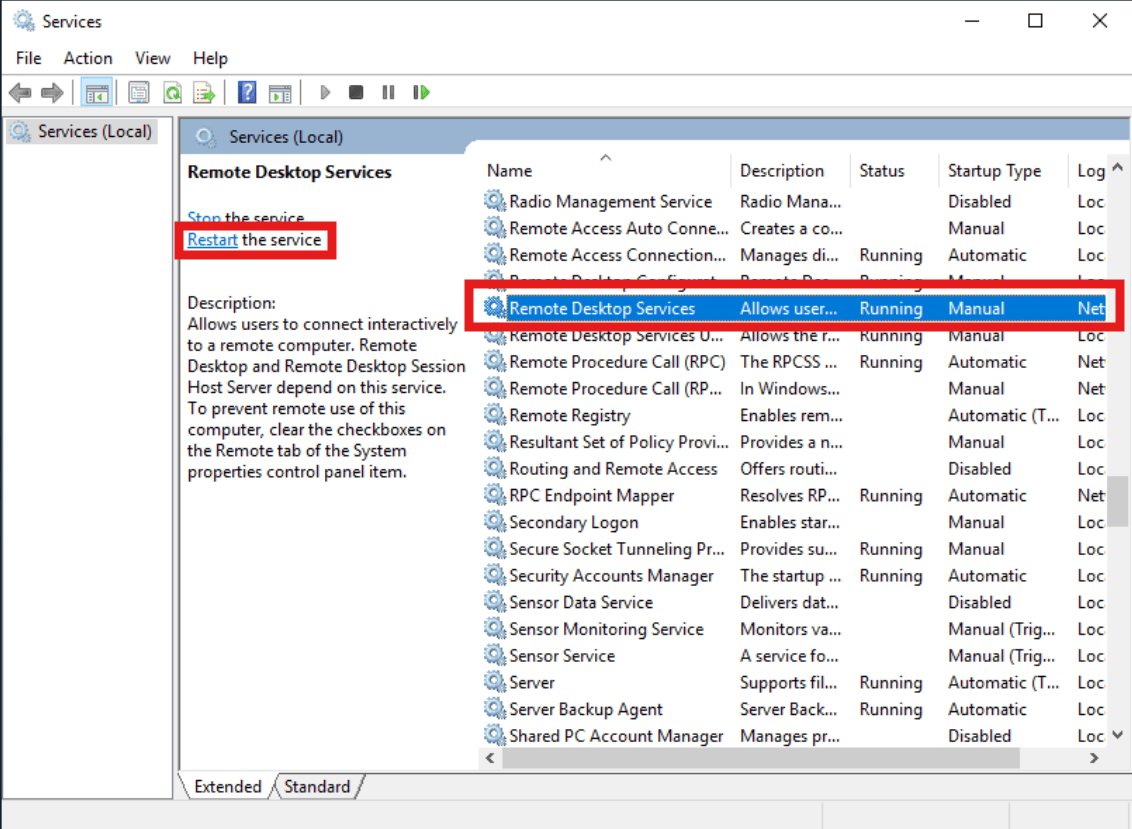
Restarting the RDP Services - This will complete the process and you should now be able to login to your Windows Server using the new RDP port you’ve configured.
Further Assistance
For any further assistance involving Remote Desktop Services, do not hesitate to reach out to the Hivelocity Support team via a chat, support ticket, or phone at 888-869-4678.
-Written by Pascal Suissa